This article is designed for those who admire gemstones and would like to use the art of lapidary to polish stone. Children enjoy collecting stones and will be amazed by the transformation but they will require assistance.
What is lapidary?
Lapidary comes from the Latin "lapis" meaning stone, and the word can refer to the person who cuts and polishes stone or to the craft itself.
What are gemstones?
The term can cover all precious and semi-precious stones. The special qualities distinguishing a gemstone from any ordinary rock or mineral must be beauty, strength and rarity. A piece of jewellery must be pleasing to the eye and the stone hard enough to be durable in everyday use. The rarity, though not affecting the other two properties makes the stone more desirable.
How can they be used?
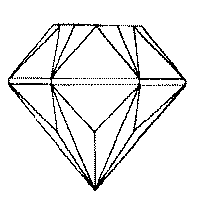
| The very clearest, hardest, crystalline material can be faceted. This involves cutting the stone with many flat faces which will refract light causing it to sparkle. Its hardness enables it to retain the many sharp edges cut. Opaque stones do not benefit from faceting as light does not pass through them. The only exception to this is hematite, which has a mirror-like finish and is enhanced by faceting. Opaque stones are usually cut in a dome shape with a flat back; these are called cabochons. |
 |
The hobbyist, with a small amount of equipment, can achieve a similarly pleasing effect cheaply and easily by tumble-polishing. It is to this aspect that I have dedicated this booklet. Tumble-polishing consists of putting a quantity of stone into a round vessel with water and abrasive grit and turning it mechanically until the stones have been worn progressively smoother. This produces stones of assorted random sizes and shapes which can then be mounted.
Equipment.
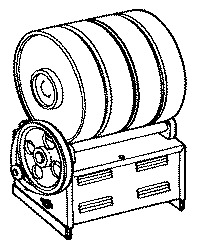 |
The easiest way to begin is to obtain a small tumble polishing machine such as the one shown. These are usually offered with a choice of one 2lb. barrel, or two 1lb. barrels. Read carefully any instruction leaflets supplied, machines will operate for many years if properly maintained. |
You will also need a range of silicon carbide abrasive grits:-
- 80 (coarse)
- 220 (medium)
- 400 (fine)
- Also needed is a polishing compound, cerium oxide.
Other requirements are:-
- an old basin or bucket,
- detergent,
- water,
- oil
- polystyrene flakes or similar.
- Finally, of course, a quantity of stone to polish.
Many people take up tumble-polishing as a result of having collected pebbles during beach holidays. Around the coast of Britain a variety of semi-precious stones can be found. When searching, walk along the beach towards the sun as the tide is receding. The translucency of the gemstone will catch your eye as it lies wet in the sun.
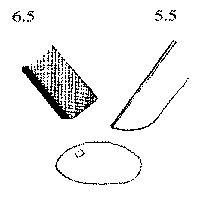
| Take in your pocket a plastic bag and a penknife or steel file. Quartz will be unscratched by these, a fragment of water-worn glass will be. |
 |
Jasper, an opaque red or green stone is found on many beaches and makes an admirable polished specimen. Avoid any stones with bands of quartz or feldspar running through them. These will not polish well. For a wider range of stones contact a specialist rock shop who will be able to supply you with rough stone from around the world. They may be prepared to send out a mixed batch of stones of similar hardness.
Selection.
Select from a range of stones of similar hardness. Opinion varies on how to select sizes of stone to tumble together. Some advise not mixing different sizes as they will grind at different speeds, another opinion which I favour is that small stones are necessary to make contact against the concave surfaces of larger stones. Avoid stones over 4cms., they will damage small stones. If you have a large batch you may consider splitting it into a crystalline quartz batch and an agate batch. Whilst hardness is similar, the agates tend to be tougher and may cause the other quartz to splinter.
Moh's Scale of Hardness-
This is a scale used by the lapidary to determine the degree of hardness of a gemstone. It has been formulated by giving talc, the softest stone, a value of 1, the hardest, diamond, a value of 10 with eight other minerals arranged at values between. The values are shown below
| Talc |
1 |
| Gypsum |
2 |
| Calcite |
3 |
Amber |
| Fluorite |
4 |
Jet |
| Apatite |
5 |
Turquoise, Glass |
| Feldspar |
6 |
Moonstone, Sodalite, Jade |
| Quartz |
7 |
Amethyst, Other crystalline quartz, Garnet |
| Topaz |
8 |
Spinel |
| Corundum |
9 |
Ruby, Sapphire |
| Diamond |
10 |
The stones in the right column are common gemstones matched to their approximate hardness against the internationally recognised scale though some of them fall between levels, i.e. Nephritic jade is 6-6.5 and Jadeite is 6.5-7, both are forms of jade, one form being slightly harder than the other. Household objects can help you identify minerals by their hardness, but learn to tell the difference between a metallic mark left on a mineral and a scratch made into a mineral. A finger nail at hardness 2.5 will scratch gypsum and talc. A copper coin at 4 will scratch calcite and softer, a penknife at 5.5 will scratch apatite and softer and a steel file at 6.5 will scratch feldspar but not quartz. In selecting stones for tumble-polishing these hard stones at 7 are most suitable. A quartz crystal is easy to carry on a field outing, if the crystal won't scratch the pebble or if it will only do so with difficulty then the stone will be suitable for polishing. Keep any of these slightly softer stones for a separate batch to polish. This scale relates only to hardness, toughness is also an important factor. Jet is relatively soft but, because it is tough, carved jewellery has survived since Roman times: opal is hard but has to be set with care as it lacks toughness and chips easily.
Stages of tumbling.
References will be made to rinsing stones and washing out barrels. It is important that I draw your attention to the fact that none of this water should go down sinks or drains as the residue sets like concrete. Leave it in an old container to settle, pour off the water, put sludge on the garden or bag it for the dustbin.
Stage 1.
The barrel should be filled to ? of its capacity with stone. Check the weight of the stone and add between 10% and 30%. of the weight in course grit no. 80/120. (The smaller percentage would be used for softer stones, the larger for tougher.) Cover the stones with water and firmly replace the cap. Plug in and turn on the machine, place the barrel on the rollers and listen for a nice, steady sound of rolling pebbles. If an irregular throwing sound is heard the load may be too light, if a slipping sound is heard the load is too heavy and the pebbles are not able to rotate. In either case, adjust the volume accordingly. Inspect loads every couple of days to release any build-up of gas in the barrel. Some push-fit lids may be easier to open if warmed under a hot tap.
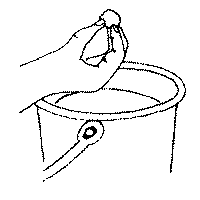 |
After a week examine the batch by rinsing the stones in a bowl of water and drying them to see if the sharp edges are removed. |
If the batch requires further coarse tumbling it will be necessary to add more coarse grit at this point as the grit itself becomes worn and reduced in size. Replace stones, top up with water, replace lid and return barrel to machine. If you are satisfied with the progress the stones have made, thoroughly rinse stones and barrel, removing both end caps (if applicable) so that none of the coarse grit is transferred. If there are a couple of stones which are not quite ready to progress remove them ) and leave them for the next coarse batch. Try to keep a supply of interesting beach pebbles to top up the barrel) when removing stones to maintain it at ? full. Eventually you will have a selection of part-ground stones to top up with. Keep these in boxes, ready labelled for which grind they are to be added to.
Stage 2.
With clean barrel and stones you are ready to progress. Fill the barrel as before, but using 220/320 grit. Grind for a week as before. It is worth saying that the coarser grit will have in any case been reduced to this size so often modern machine instructions recommend omitting this stage.
Stage 3.
Proceed, as previously, with clean stones and barrel, but this time with 400/500 grit. After a week your stones should have completed the grinding process.
Stage 4.
The transfer to this stage requires the utmost cleanliness so that none of the silicon carbide is transferred. You may like to return the stones to the barrel and tumble with water and detergent for a few hours. Rinse again to remove traces of detergent. If funds allow, it is worth having a separate barrel which you label and use only for this polishing stage and the next rinsing stage. Place stones in the barrel, cover with water and add 10% cerium oxide powder. This polishing process is aided by the addition of polystyrene pellets, felt or leather scraps and will take about four days to complete. It is at this stage that your stones take on a lustrous gleam. Unlike the previous stages the liquid is not discarded at the end of this cycle. The cerium oxide is unaltered and is able to be used again and, as it is an expensive compound, it is worth the trouble of reclaiming it. Open the barrel and pour out the liquid into a clean jar together with rinsing water. Leave it to settle and
siphon off the water. Replace the jar lid. Thoroughly wash the stones.
Stage 5.
All that remains to be done is to place the washed stones into the clean barrel with water and two tablespoons (15 mls) of detergent and tumble for anything from 4 to 12 hours as convenient. This will remove any traces of polish. Rinse stones and leave to dry. I hope you will be delighted with the result achieved.
The next step - decorative uses.
Having tumble polished your stones you may like to keep them in a glass vase as a decorative feature. I have known them be strewn along a dining table as a change from flowers or candles making passing the serving dishes easier and providing an interesting talking-point for guests. Plain vases can have stones stuck on to decorate them. The list is endless. The most common use is probably that of creating a piece of jewellery from stones and as some of you will want to do this the following pages will be of interest to you.
Findings.
This is the name given to metal components which enable you to turn your stone into a piece of jewellery. These can be purchased from rock shops, hobby shops or mail order catalogues. They can be obtained in plated metals and, to a lesser extent, sterling silver. Gold findings tend to be designed for cut stones and would prove expensive for the hobbyist. There is a wide range of plated findings available for brooches, bracelets, rings, earrings, pendants, cuff-links, tie-tacks, etc.
Adhesives.
The use of epoxy glue is recommended, this type comprises a resin and a hardener which remain fluid until mixed in equal parts. Pay attention to the setting times, some take several hours. You need to know that your stone is firmly stuck before leaving it, otherwise you may return to find the finding has slid from your selected position. (I prefer a two-minute glue but this leaves little time for correction and can be wasteful on unused mixes.) A choice of a 30-minute glue might be most suitable for a beginner.
Have together everything you need before starting to glue:-
2-part adhesive
prepared stones
prepared findings
match sticks or cocktail sticks
card or disposable mixing palette
"Blu-Tack"
Remember to work with good ventilation, avoid skin contact with glue and wash any possible residue off hands after use.
Preparation for Adhesives.
Having polished the stones you will be able to sort them into like shapes and sizes. Keep them in labelled bags. Drop shapes make good pendants and key-rings, while flat stones could make brooches and rings and pairs of closely matched stones may be useful for cuff-links and earrings. (Remember that there is a limit to the weight that can be suspended from a pierced ear !) good contact with the stone by bending over prongs or grinding down a flat area on the stone as appropriate. It is felt that abrasion provides a good key for the adhesive. Use a piece of discarded grindstone or a stick from a lapidary supplier. Roughen only the small area that will be covered by the finding and if using a finding with a pad, roughen this also, removing any flakes of plating.
Many pieces of craft-work are spoilt at this stage by the use of too much glue. Don't despair if a little runs out from under the finding, leave it to dry then, working away from the finding, remove the excess with a sharp blade.
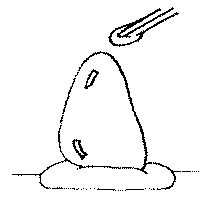
| I find a strip of "Blu-Tack" useful at this stage, stones can be held upright whilst bell caps are applied, or can be positioned on it so that a horizontal surface is uppermost to accept a brooch finding. I even use "Blu-Tack" to handle small findings. After mixing the epoxy glue I use a matchstick to apply a small quantity of glue. |
 |
The jump ring is one finding you will probably want to use at some stage. These are small, round or oval connecting rings which are used to connect bell caps to chains. These are supplied in an almost closed position and to be used must first be opened, the finding and chain inserted hen closed. Using two pairs of smooth-jawed flat nosed pliers, open the jump ring sideways and close it in a similar manner his way the ends will line up perfectly and the circular shape will not have been distorted. Experience will teach you which stones are suited to which piece of jewellery and which bell cap is the correct proportion for the stone you are using. Early mistakes can be remedied, try removing the finding with sharp knife. Finally, if you are giving the piece of jewellery you have created as a gift, take the trouble to put it in an attractive box. These are available from your findings supplier and do justice to something you have spent a long time making.
Beach pebbles.
There are many beaches in Britain which will yield interesting stones, unfortunately I am unable in this booklet to describe them in detail. However, I hope the map opposite will provide a starting point. By searching in the manner described earlier you are likely to have success. Locally, you may be able to find information to help you identify the exact beaches which have semi-precious stones. Be sure to obtain advice regarding local hazards and tides.
Key to map.
| A: |
Agate |
| Am: |
Amethyst |
| Amb: |
Amber |
| C: |
Carnelian |
| Ci: |
Citrine |
| G: |
Garnet |
| J |
Jasper |
| Je: |
Jet |
| S |
Serpentine |
|
 |
The Gem Den.
Sue Kane's interest in gemstones originally involved her in using her tumble-polished stones to make key-rings and pendants for local fund-raising. Later her enthusiasm led her to design her own jewellery and attend craft shows. Now she has her own specialist rock-shop, unique to the area, where she produces her own jewellery in the workshop, and also stocks a large range of gemstone jewellery including British hand-cut stone. The Gem Den also stocks geological books, lapidary equipment, polished stones, mineral specimens, fossils and gemstone gift items.
The Gem Den, 31 King Street, Penrith, Cumbria . CA11 7AY
Assistance with artwork was given by M.L. Beach Products Ltd., and Manchester Minerals.
Every effort has been made to accurately describe the process of tumble-polishing but the reader must ensure his own safety when using machinery and tools.
Copyright Sue Kane Designs 1992.
No part of this document may be reproduced in any form without written permission of the author.


